The USU STARS! GEAR UP Administrative Team's data and evaluation team provides guidance and oversight to each USU STARS! GEAR UP Local Education Agency (LEA) on data collection, analysis, and submission efforts. The Administrative Team monitors data entry to ensure data entered in the USU STARS! GEAR UP SCRIBE database is complete, accurate, and non-duplicative. The Administrative Team reports annual progress on the project's performance to the U.S. Department of Education in an Annual Performance Report (APR) due April 15th each year. Diligent year-round work at the school and district level to consistently collect and submit data is vital to the USU STARS! GEAR UP Administrative Team's ability to meet federal reporting requirements necessary for continued funding. In addition, the Administrative Team supports the implementation of data-driven decision making, ensuring that robust services and academic interventions are targeted to the individual students most in need of specific interventions. To assist schools and LEAs in the implementation of a data-driven program, the Administrative Team has staff that will assist in reviewing services and data outcomes.
The purpose of GEAR UP nationally is to support early college preparation and awareness activities for students in low-income schools. As defined by Congress in the Higher Education Act (HEA) and the reauthorized Higher Education Opportunity Act (HEOA), the overall GEAR UP goal is to significantly increase the number of students who are prepared to enter and succeed in postsecondary education.
USU STARS! GEAR UP developed project objectives and performance measures that are designed around HEA/HEOA. USU STARS! GEAR UP's objectives drive the project at the state, LEA, and school level. The external evaluator, RGI Corporation, will provide annual formative evaluation reports to equip staff with information about project implementation and student academic outcomes. These reports allow for ongoing data-driven decisions to be made by the Administrative Team and LEAs as the cohort progresses towards high school graduation and postsecondary education.
At the end of the project, the evaluator will conduct a summative, or final, evaluation that will assess the project's overall impact. The Administrative Team will submit the formative and summative evaluation reports to the U.S. Department of Education with the APR.
Activity Documentation
Data must be collected for all USU STARS! GEAR UP activities using activity sign-in sheets provided by the Administrative Team. Site coordinators must store the files in two locations (electronic or hard copy files are allowable) for seven years after the end of the grant. Regular data audits include, but are not limited to:
Sign-in sheets and field trip forms reviewed to ensure documentation matches the service participation data entered into the SCRIBE data system. Data collection and reporting procedures are further explained in this section.
Collaborative partners SCRIBE (Xcalibur, Inc.) and RGI Corporation maintain student-level demographic, service, and outcome data required for federal performance reporting and continued funding. SCRIBE is an online point-and-click and manual entry database and student tracking service where USU STARS! GEAR UP site coordinators will enter student, parent/family, and teacher/professional activity data after sign-in sheets are collected. The sign-in sheets used to enter data into SCRIBE will need to be filed by month and year. Uploading sign in sheets is also an option. Hard copies must also be kept.
Annual Performance Report (APR)
The USU STARS! GEAR UP Administrative Team is required to report annually to the U.S. Department of Education by April 15th. The APR is used to determine whether substantial progress has been made toward meeting objectives outlined by the project plan and determines continuation of funding at the state and local level. As required by the Government Performance and Results Act of 1993 (GPRA), the APR is also used to collect data on the performance of GEAR UP at the national level. Data elements may change annually.
These highlights are an opportunity for each LEA to showcase the great work they are accomplishing over the reporting period and to highlight their success through data. The information obtained through each LEA's APRs will be shared with the U.S. Department of Education in the federal APR completed by the USU STARS! GEAR UP Administrative Team. One component of the federal APR is a profile of each partner LEA that outlines the schools served and number of students served by grade. In addition, the profile will include a narrative component provided by the district-level staff in the LEA APR.
Data Collection Plan & Checklist
This table is the USU STARS! GEAR UP's data collection cycle. Data elements are critical to USU STARS! GEAR UP meeting program objectives and performance measures at the school and district levels. The table shows the data that must be collected and entered into the SCRIBE data system, and/or submitted to the Administration Team; when the data must be provided and how often; and who is responsible for ensuring data is submitted.
USU STARS! GEAR UP Data Collection Plan
Type of Data to be Collected
Frequency
Deadline
Data Source
Responsible Party (Primary)
Student Demographics
Twice per year
September/January
Site coordinator entry in SCRIBE
Site Coordinator
Tutoring Services
Weekly
Weekly
Sign in sheets & Entry in SCRIBE
Site Coordinator
Mentoring Services
Weekly
Weekly
Sign in sheets & Entry in SCRIBE
Site Coordinator
Student Activity Participation
Monthly
Submit services monthly by the 15th (or next business day)
Sign in sheets & Entry in SCRIBE
Site Coordinator
Family Activity Participation
Monthly
Submit services monthly by the 15th (or next business day)
Sign in sheets & Entry in SCRIBE
Site Coordinator
Teacher Professional Development Participation
Monthly
Submit services monthly by the 15th (or next business day)
Sign in sheets & Entry in SCRIBE
Site Coordinator
Student and Parent knowledge/aspirations for college
LEA-level Annual Performance Report (APR) due to Administrative Team
Annual
January 1
N/A
Site Coordinator with Program Coordinator signature
Additional Obligations
Program Level Annual Performance Report assistance as needed
Annual
Submission Deadline April 15
N/A
Site and Program Coordinator; LEA/District Data Manager
SCRIBE Database Training
Annual
September
N/A
Site Coordinator
Best practices and pictures submitted through Kissflow
Monthly
Submit monthly by the 15th (or next business day)
N/A
Site Coordinator
Ongoing Data Collection
Maintain accurate and up-to-date documentation of USU STARS! GEAR UP student, parent/family, and teacher professional development services and activities.
Ensure sign-in sheets are administered and collected at all USU STARS! GEAR UP student, parent, and educator professional development events, and correctly store even if you are not present.
Provide names and demographic information for any new USU STARS! GEAR UP students.
Monitor USU STARS! GEAR UP students' withdrawals from and returns to school; update in SCRIBE data system.
Keep and file paper and/or electronic sign-in sheets.
Weekly
Enter all activities into the USU STARS! GEAR UP SCRIBE data system. Refer to the USU STARS! GEAR UP Student Service definitions when assigning activities to categories in the data system.
Monthly by the 15th of the Month
Review SCRIBE Activities data entry web page to compare with sign-in sheets before submission.
Submit your service activities in SCRIBE for approval from your program coordinator.
Submit your invoice for the previous month to USU STARS! GEAR UP Administrative Team.
End of School Term
Submit end of school-term data including course enrollment, completion, and final grades in SCRIBE, at the conclusion of each school term. You may work with district/LEA data managers to gather this information.
Annual
Fall:
Participate in annual USU STARS! GEAR UP data system trainings.
Assist the USU STARS! GEAR UP external evaluator in distributing and collecting surveys and other data collection procedures.
LEA Annual Performance Report due to the USU STARS! GEAR UP Administrative Team.
Spring:
Assist A-Team in obtaining any additional data items needed to complete the Annual Performance Report due to the U.S. Department of Education by April 15th.
Database Entries & Definitions
The USU STARS! GEAR UP database, SCRIBE, is an online data tracking system designed to report student, parent/family, and teacher activities and services. Students are noted in SCRIBE in terms of their participation, academic, and outcomes data. You should use the following USU STARS! GEAR UP Student Service Definitions when determining the category to assign a particular student and/or parent/family activity. It is imperative that you follow these guidelines when entering data to ensure that services are correctly categorized, non-duplicated, and accurate. These guidelines are not only used to evaluate Utah's GEAR UP program, but also that of many other states.
Activities that meet more than one category definition can be split into time blocks that are recorded as separate activities. For instance, an afterschool club with 2 hours total time with different activities (Tutoring and Chess Club, for example) can be listed in SCRIBE twice: 1) one hour Tutoring/Support Services and 2) one hour Rigorous Academic Curriculum.
GEAR UP Student Service Definitions
Data Entry Timeline Checklist
End of Spring Term (June 15)
Final APR Course Grades (including incompletes). The final grades are used in the APR to determine number enrolled in the course and the number passing the course.
End of Summer (July 31)
End of school year for APR reporting purposes
All summer service activities
Update student progress
Summer enrichment make-up grades
Students with 10 or more unexcused absences for school year (include summer)
Beginning of New School Year (August 1)
This is when SCRIBE promotes students to the next school year and new school (if applicable)
Second Week of August
Review student enrollment and make applicable changes
On-Line student and parent surveys accessible
Ongoing or As They Occur
Enroll new students
Include SSID, name, gender, grade, ESL, FRPL, IE, date of birth, enrollment date
Exiting students
Include exit code, exit date
Student, parent, teacher APR service activities
As soon after the event as possible
Update progress
Unexcused absences
Took Explore and/or Aspire (scores)
Took PSAT or PLAN (scores)
Took SAT or ACT (scores)
Completed FAFSA (date)
Beginning of Terms
Add Courses
Include course grading system
End of Terms
Course completion
Course grade
RGI Monthly Report
Review for data completion and accuracy. Report provided to LEA. Report provided to LEA. They also look at demographic data for completeness
USU STARS GEAR UP Monthly Review
Service activities reviewed on the 18th of each month
Standard Courses Reported in the APR
Pre-Algebra
Algebra I or equivalent (Secondary Math 1)
Geometry (Secondary Math 3)
Algebra II (Secondary Math 2)
Calculus
Chemistry
Physics
At least one advanced placement course
Trigonometry (Secondary Math 3)
Pre-Calculus
Biology
English & language arts
At least one international baccalaureate class
At least two years of math beyond Algebra I
For further instruction on data entry, please refer to the SCRIBE manual.
Course information: Prior to students being identified as taking a class, the course information needs to be entered into SCRIBE.
At the SCRIBE startup page enter valid Username and Password
Hover mouse over Schools tab at the top and select View All Schools
Find your school and click on View in the left column
Along the new set of tabs click on Courses
Click on the arrow to the left of Search and make sure you are adding a course to the right school year
On the right side click Add
Select your school and click Next
Put in the Course Name and click Next
Fill out the required boxes as well as Mapped to the following Standard Course and click Save.
You now have the course entered into the database ready to be populated with students. If you go back to the tab Courses, you should see the Course Name and other information you put in about the course. You can always edit the course information by clicking on View and using the Edit buttons.
Student Course Enrollment & Course Grades
One can manually enroll students in courses once those courses are identified in SCRIBE. You click on the Student tab, click on View for the student you want to enroll, and click on Add Courses. A list of the courses will appear and you can click on the ones you want the students added to. This is rather cumbersome when the number of students in a course is greater than 15. The more efficient way is import a Comma Separated Values (CSV) for SCRIBE to upload into your database. [On most import files, four fields are required; School Number, School Year, Student ID, and Grade Level. When adding students to a course, additional fields are Course Number, Term, and Grade. Grade Level is not necessary.] See example below for Field Names and Information in those fields. (For import file naming conventions and other information about import files, see SCRIBE Online Help - Imports.)
Hover mouse cursor over Reports and Export (With Sensitive Information) and select Student Enrollment Export
Choose current school year, pick school, CSV file, and click Generate Report
You now have a report that contains a lot of the information about the students
Scan the list to see if any student has an Exit Code and remove that student from the spreadsheet
You now have a master spreadsheet that is the backbone for most all import files. If there are multiple grade levels at your school, you can sort all fields by GradeLevel, copy all students in each grade, and paste into a new sheet or on a separate spreadsheet. Save these CSV masters in your files, using your conventional naming standards. You may need to modify or repeat the process if new students are enrolled or students exit the program.
Once the course enrollment is finalized and acquired, from the master file add CourseNumber, Term, and Grade fields. Type in the Course Number and Term once and copy for all students. Delete students that are not in the class and save as a new master course file. Prior to submitting the file as an import file to be uploaded by SCRIBE review the file naming convention in the SCRIBE Online Help articles and change as required, then:
Course Grades
If the enrollment list with the course (term) grades is in the form of an electronic spreadsheet, you may be able to sort both spreadsheets by a common field (ex. Last Name) and simply copy the grades from the enrollment spreadsheet to your master course file. If you receive a paper copy, the grades will have to be entered individually. Once the Grades, Correct Term, and File Name is changed to reflect file content, import file into SCRIBE as per steps above.
Select the School Year for which you want to import the data from the dropdown menu
Select Browse to select the file you want to import to your computer. Once you have selected the file, select Upload Import File.
The View Specification button will display a list of all required and optional fields you can include in your import and the corresponding heading.
NOTE: The Import Specification list is specific to the type of import you are importing and the required fields for your grant.
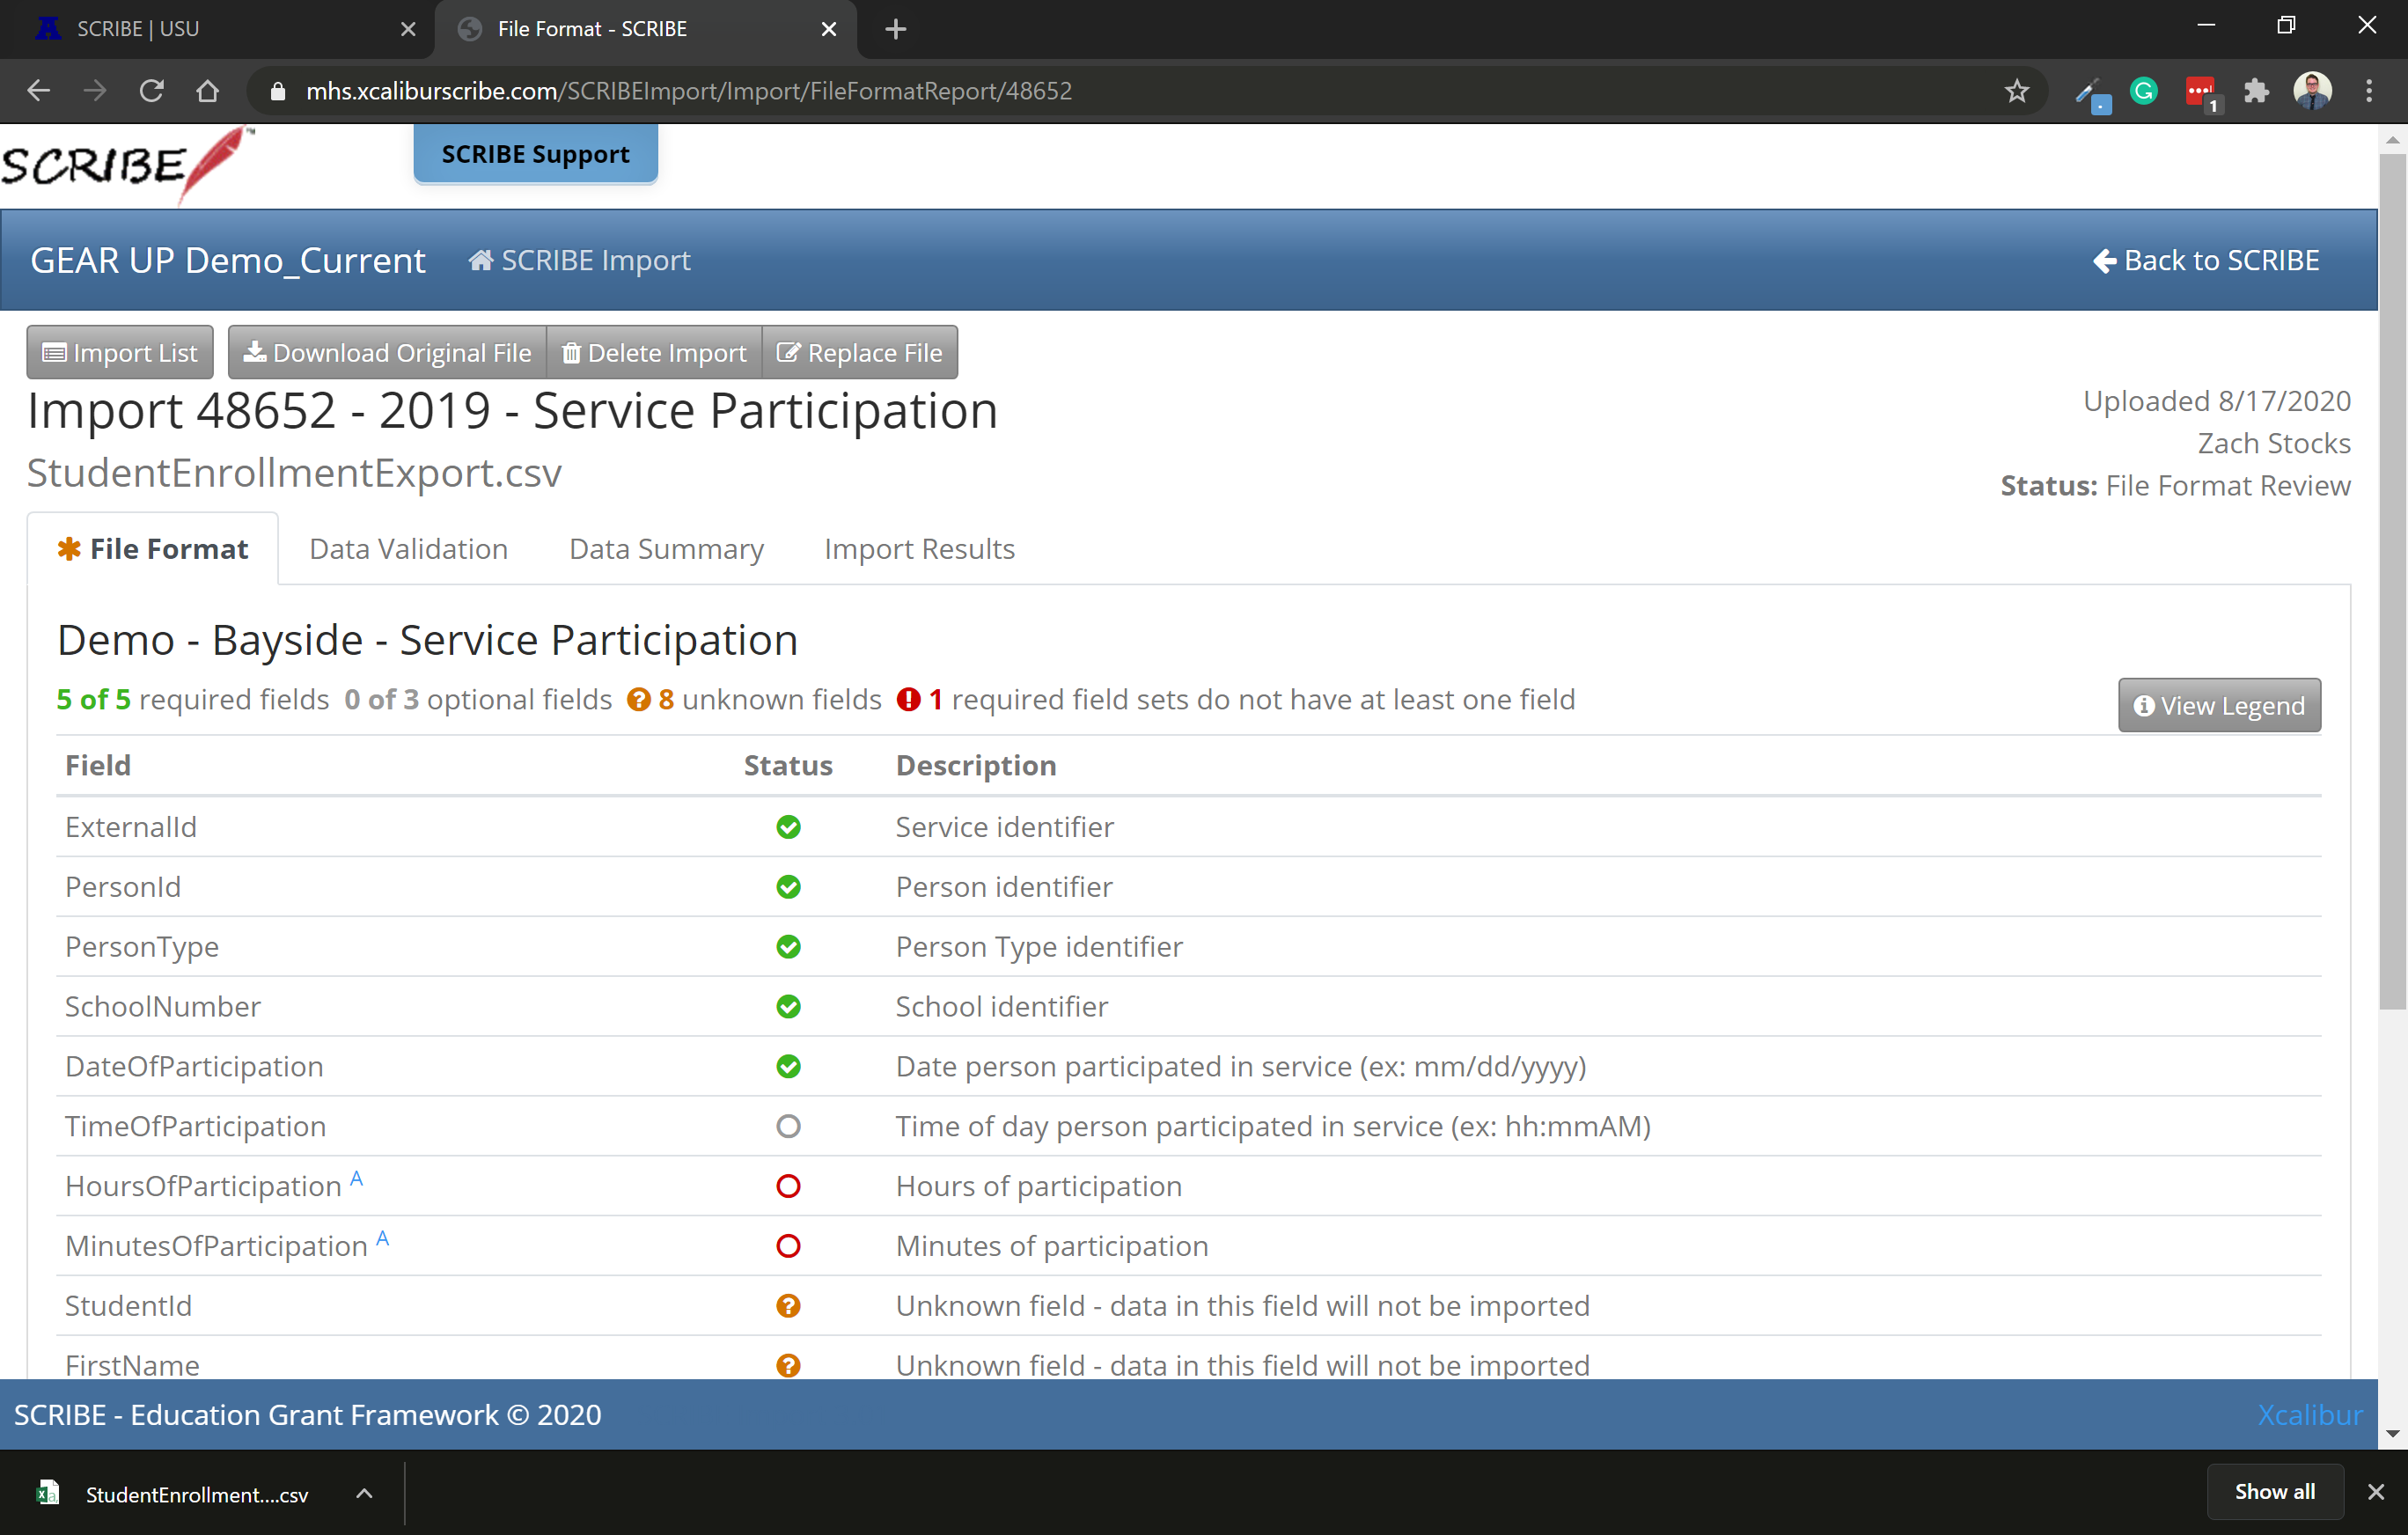
The File Format step will indicate whether there are any File Format issues with your import. If there are no issues, you will see a green thumbs up. You will also see a circle of blue dots next to the Data Validation tab indicating SCRIBE is working on this step. (See Troubleshooting SCRIBE Imports in the Help Desk for how to address issues)
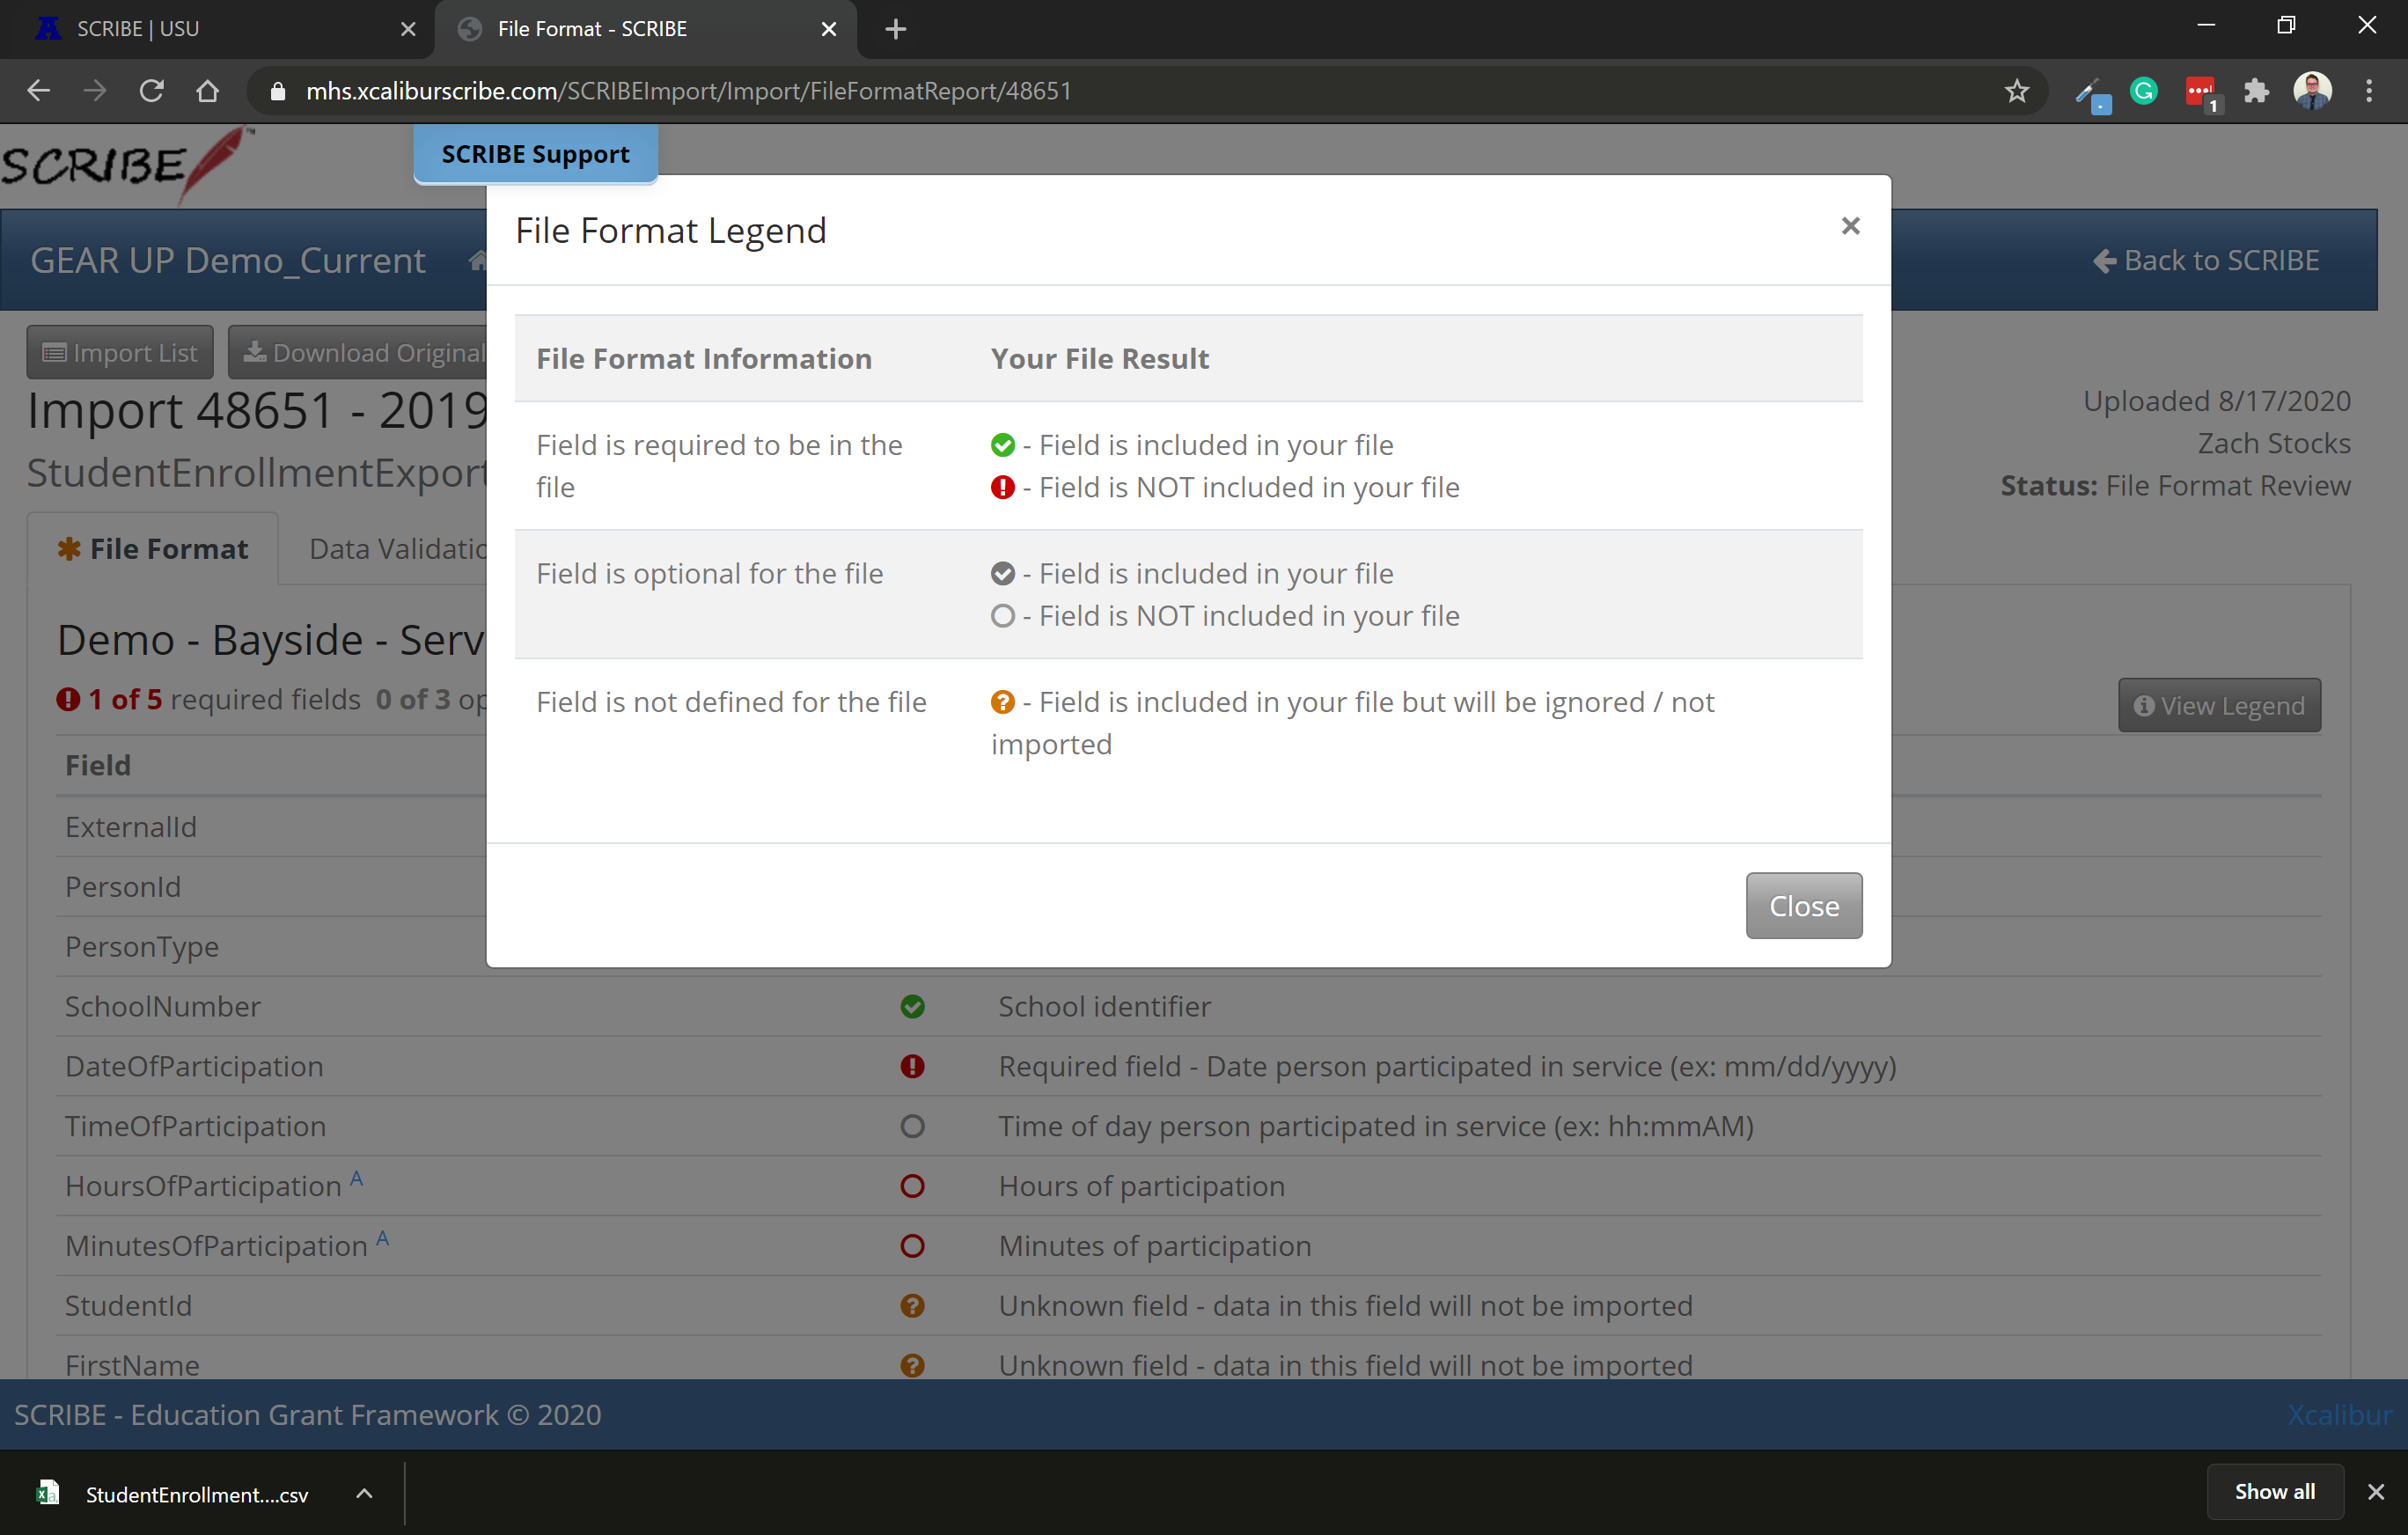
Select the View Legend button to see what the different Status colors and symbols mean.
If your file has unknown fields, they will be listed at the bottom of the File Format list and indicated in the Status column with an orange question mark. Select the Complete File Format Review button
Select Cancel Import or Approve File Format
Select Save File Format Result
You will see a circle of blue dots and Queued for Data Validation under the Status column on the Import List in the row of the file you just uploaded. This symbol indicates SCRIBE is working on this step, no action is required at this time.
The status will change to Data Validation Review and an orange asterisk will appear next to the Status on the Import List when the file needs to be reviewed. You will also get an email from SCRIBE telling you the file needs to be reviewed. Click Next and you will see a set of instructions and a list of Missing Required Fields.
Select View next to the import you would like to open
If there are no issues with the import, you will see a green thumbs up. Select the Complete the Data Valaidation button. (See Troubleshooting SCRIBE Imports in the Help Desk for how to address issues)
Select Cancel Import, Revalidate Import, or Proceed to Summary
Select Save Data Validation Result
If you selected Proceed to Summary, the import process will automatically advance to the Data Summary step. An orange asterisk will appear next to the Data Summary Review tab nidicating it is ready for you to review. An orange asterisk will also appear next to Data Summary Review on the import list and you will receive an email from SCRIBE indicating your file is ready for review. Typically this happens immediately
The Data Summary tab displays a summary of the data you are importing. Review this to ensure it is accurate
Select the arrow next to each grade level to expand the results for that grade level
Select the Complete Data Summary button
Select Cancel Import, Revalidate Import, or Approve Import
Select Save Data Summary Result
You will se a circle of blue dots next to the Import Results tab and next to Qued for Import on the import list indicating SCRIBE is working on importing your file. No action is required
Once the import is complete, you will see a green check mark next to Import Complete under Status on the Import List
Click View in the row of the file you just imported to see the Import Results tab which lists how many records were imported, how many had errors, etc
Navigating the Import Interface
Sorting & Filtering the Import List
Select a School Year from the dropdown menu to display only imports for that school year
Type a Keyword into the box to display imports with those keywords NOTE: Using conventions for naming your import files will help when filtering by keyword (e.g., all enrollment imports should contain “enrollment” in the file name, include the school name in all imports for that school, etc.)
Click the four buttons above School Year and Keyword to display:
Last 3 months — all imports uploaded in the last three months
Requiring Action — all imports that require your action to advance to the next step NOTE: These imports will have an orange asterisk next to the status.
My Imports — all imports you have uploaded
All Imports — all imports that have been uploaded to SCRIBE including imports from the previous import modules
The number next to each button indicates the number of imports in that specific filter
Buttons within the Import Steps
Select Import List button to go back to the import list
Select Download Original File to download the original excel or .csv fil you uploaded
Select Delete Import to delete the import including the file you uploaded. You will be taken back to the Import List once the import has been deleted
Click Replace File to select a new file from your computer to replace the file you uploaded
To return to the SCRIBE Home Page, click the Back to SCRIBE button located above the Import List.
Creating & Using Service Templates & Student Groups
Creating service template and student groups in SCRIBE can prove to save data entry time over the course of a school year. They are particularly useful when workshop, student club, tutoring, and mentoring data is entered weekly or monthly. For one time events, it is expedient to create a Service Activity. The advantage of using templates and student groups saves several steps and time when the activity is ongoing over a period of several weeks or months. For example, there is a robotics club that meet 45 minutes twice a week for 18 weeks with the same students attending. USU Stars GEAR UP staff is required to assess program service activities on a monthly basis. The redundancy of creating a service activity and populating it five times over the span of the club's life lends itself to errors in data entry. With service templates and students, some of the chance of data errors are negated by using some the same information each time.
Using the scenario above, the steps for creating a service template are:
Open SCRIBE with username and password
Hover cursor over Services and select Add Service Template
Select Person Types (Student) and click Next
Select Service Type Category (Workshop) and Delivery Method and click Next
Select Student Workshop and type in Description
Give the template a unique name, answer the questions, and choose Default Activity Summary
Click Save
Click on School Mapping and click Edit
Choose School and Save
A service template has been created that one can use multiple times to record student participation.
Create a Student Group
This involves identifying a student (or teacher or parent) group and populating it with members:
At the top of the page, hover the cursor over Schools and select View All Schools
Select desired school and click View in the left column
On the new set of tabs, click Student Groups and click Add
Type in a group name that will provide a clue as to its membership and purpose
Populate the group by clicking on Group Membership and click Add
A new page appears that has a list of all students
Since this club only has 7th graders, click the arrow next to Search and pick Grade Level 7 and click Search
Now the list is only 7th Graders
At the bottom of the list, for Page Size select All
Select the names of the students who are in the club and click Save and Close at the bottom of the page
A student group has now been created that will be entered when the activity has occurred.
Use a Service Template
In the hypothetical scenario above, the Robotics Club meets twice a week for 45 minutes at each meeting. Prior to the month’s group meeting, pull up the Service Template and complete the requirements as per the Site Coordinators Manual.
Hover the cursor over Services and select Add Service
Select School and Next
Select Student and Next
The page contains a list of Service Templates and select the one created above and click Next
Fill out the Service Name (ex. Oct 7th Grade Robotics Club, Service Notes, and click Save)
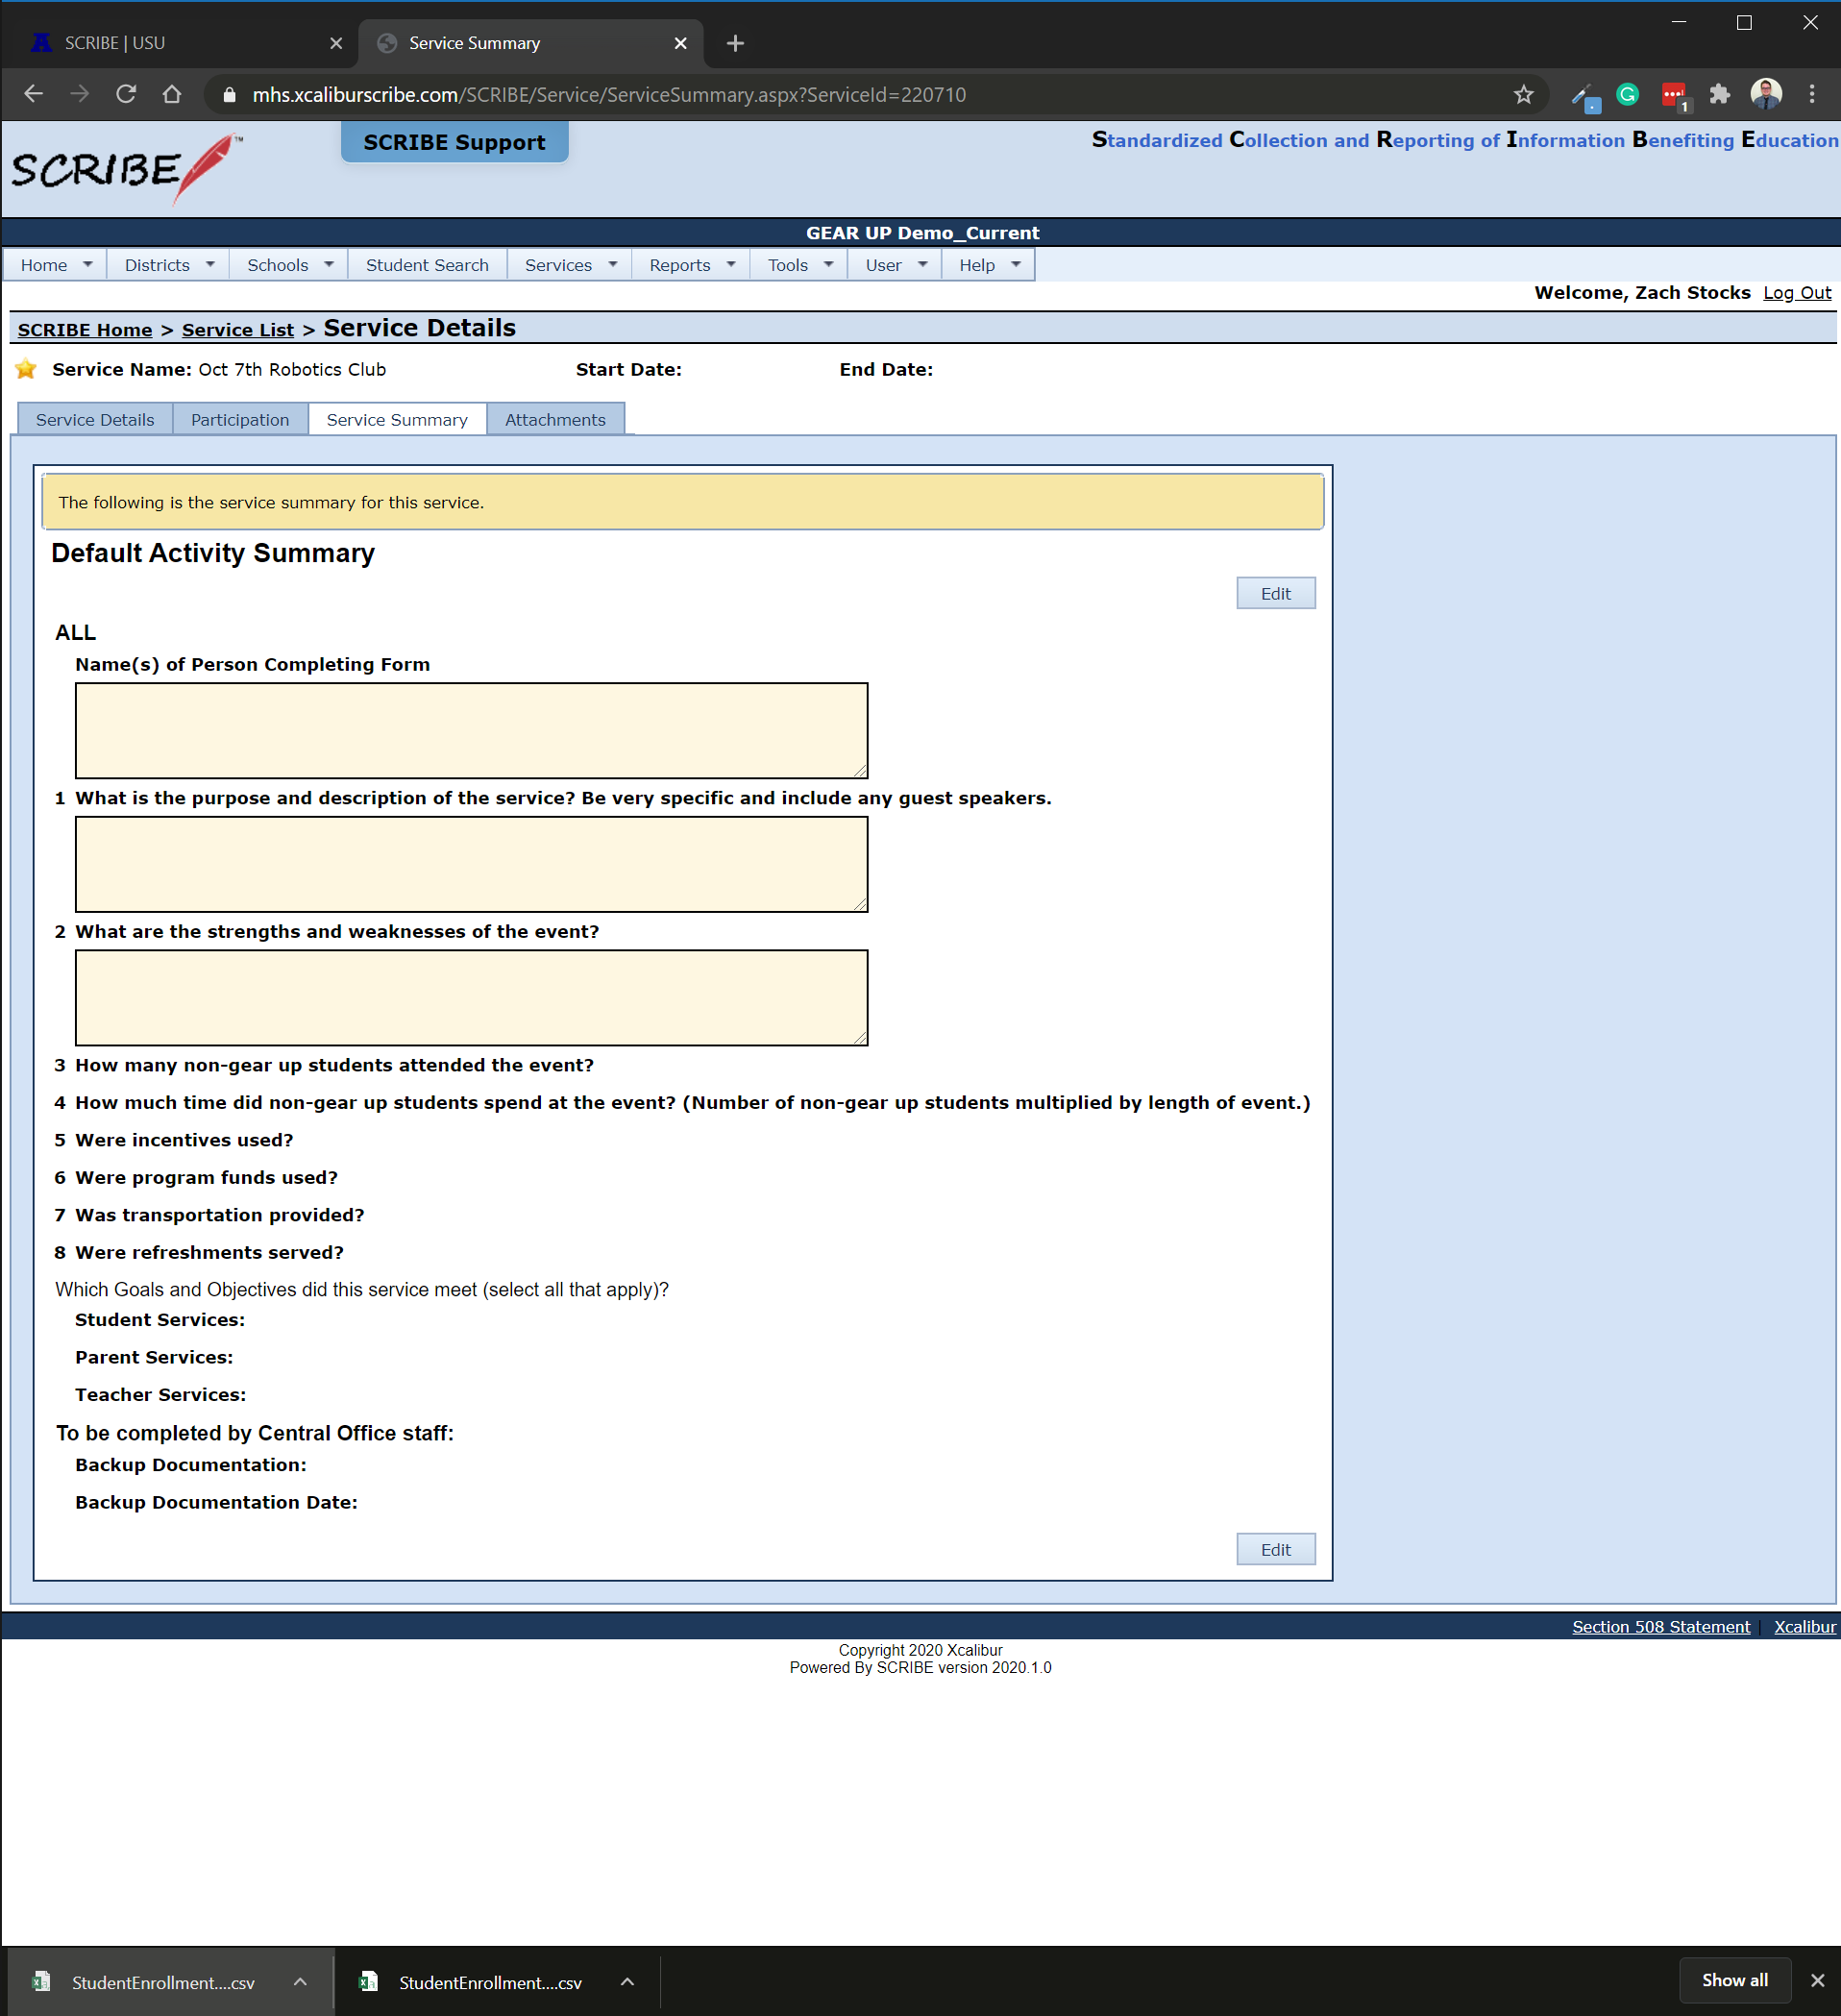
On the tab, click Service Summary and fill out for requirements
What has occurred is the service template has been used to create a form to use for a specific event. The template has not been altered and can be used multiple times.
Complete the Service Activity
Complete the service activity by adding students, dates, time, etc
Log into SCRIBE
Hover the cursor over Schools and select View All Schools
Click View on the right column
On the new set of tabs, select Services
Find the Service Name created above and click View
Click on Participation tab and click Add
Toward the bottom click on the arrow next to Search
Find the Student Group created above, click on it, and click Search
The students in that group will appear and click on the empty check box to select all
Put in the Date of Participation (usually the last day of the month activity took place)
Put in the hour - minutes per student (in the scenario above, 4 weeks x sessions/week x ¾ hr/session = 6 hours) and click Save and Close
Click on the Service Summary tab and complete as per Site Coordinators Manual
Click on the Service Details tab, click on Edit and put in the Start and End Dates, click Next and Save
SCRIBE Service Naming Conventions
Naming format:
Duration.servicetype.description.mmmyyyy.school
Duration: OneT (once per month) or Rec (reoccurring ie: monthly)
Service Type: TLA, TMT, MEN, etc. from the Service Taxonomy listed below
Description: Additional information regarding the service. For example, the name of the campus, name of the tutoring program, time of day of the tutoring
mmm: First 3 letters of the month
yyyy: year
School: School abbreviation
Examples:
OneT.CVS.USU.Sep2017.CHS
Rec.TMT.PeerLunchTutoring.Sep2019.MLMS
Service Taxonomy
* S = Student, P = Parent, G = Guardian
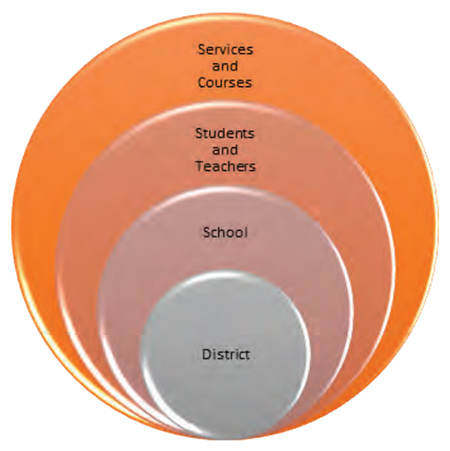
Building Data Structure
When building a SCRIBE database, distinct levels of information are added. Each level is built upon previous data
structures. The sequential data levels are:
District (name, ID, address)
School (name, ID, address, term period, grades served)
Students and Teachers (name, ID, demographics, grade)
Activities and Courses (name, type, occurrence, duration)
Required data for each level must be in place prior to entering information for the next level. For instance, schools need to be populated with students and teachers, then when courses are added, students can then be placed in those courses. When the students are in the course, they can then be assigned a grade.
Once the data is in place and complete, SCRIBE has many features designed to help users extract information beneficial for meeting GEAR UP objectives:
Provide post-secondary financial aid information for students & parents
Reduce post-secondary remedial course by enrollment in rigorous/challenging curricula
Increase number of students obtaining high school diploma and enroll in college